All bike frames, whether they’re made from steel, aluminum, titanium, or carbon, eventually fatigue.
This happens gradually, as the frame ages and absorbs the vibrations and shocks from riding. But it can also happen suddenly, when you fall from the bike or crash it into a wall, fence, or vehicle.
A fatigued frame or a damaged frame can crack. And a cracked frame, because it can give at any moment of time, is unsafe to ride. Repair it or replace it for another one, but don’t ride it as it creates hazards for you and those around you.
Sometimes, these cracks are large enough to be obvious. However, a crack can also be subtle—which is why experienced cyclists inspect their bicycles regularly, and looking for cracks on the frame is an important item on their checklist.
Why Frames Inevitably Crack
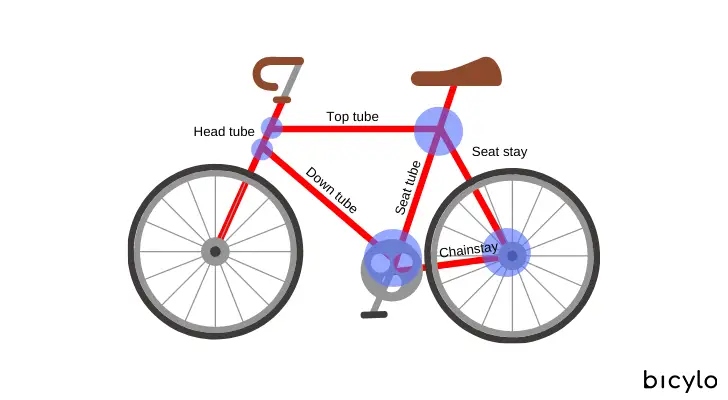
A bicycle frame is a bunch of tubes of various length, width, shape, and thickness joined together.
When a frame has been designed well, constructed properly, and ridden appropriately, the whole is greater than the sum of its parts. The frame holds all the parts of the bicycle together and supports the weight of the rider.
If any of these three things isn’t true, or the frame is old and on its last legs, the stresses from the shocks and vibrations of riding and the weight of the rider will cause it to crack.
Cracks weaken the frame’s structure and hamper its ability to serve its purpose. This is why a cracked frame will inevitably snap into pieces and fall apart. To make matters worse, it tends to happen at the worst possible moment, whether at high speed, when braking, or during cornering.
No frame lasts forever.
As a general rule, aluminum frames need to be replaced after 2½ to 5 years, steel frames 5 to 7½ years, carbon frames 7½ to 10 years, and titanium frames 12½ to 15 years. (Depending on the frame, the terrain, and the rider.)
Related: How Long Do Bicycle Frames Last?
Where Bicycle Frames Crack
The joints are the weakest part of any structure.
This is true for the skeleton in your body, the construction of the building whose roof you’re under, and the frame of your bicycle when you ride it.
Typically, bicycle frames crack and fail at the tubing joints.
So the parts of the frame to pay the most attention to when you’re inspecting for cracks can be found:
- At the bottom bracket shell where the seat tube, down tube, and chainstay meet.
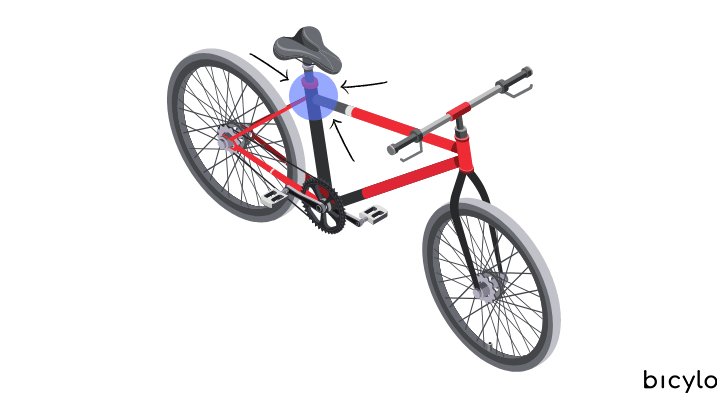
- Under the seatpost where the seat tube and top tube meet.
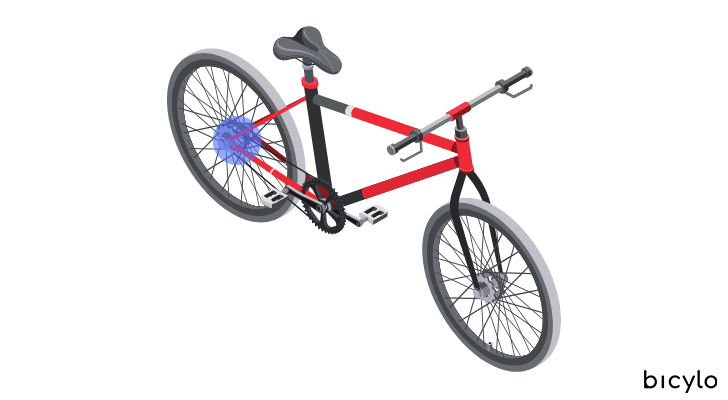
- At the dropout where the seat stay and chainstay meet.
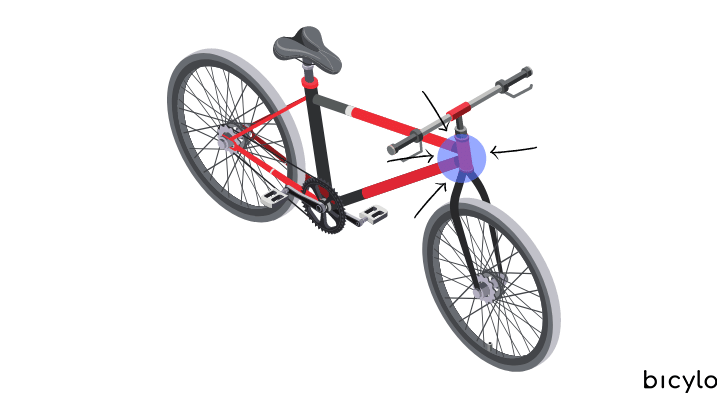
- Above the fork where the top tube, head tube, and down tube meet.
That’s not to say that a frame can’t crack elsewhere. It’s just where the structurally weakest parts of the frame tend to be.
In a way, this is logical.
The tubing joints are where the ends of two different parts of the frame meet. They are subjected to a great deal of mechanical stress, as the shocks and vibrations from bumps, potholes, and running over foreign objects are passed onto them.
The combined force from the Earth’s gravitational pull, the weight of the rider, and that of the frame also play a major role. So does the bending and flexing of the material.
How to Inspect Your Frame for Cracks
How to Prepare
Always clean your bike before inspecting your frame. If you don’t, you might miss the signs of damage or small cracks that would have been visible had you cleaned the bike beforehand.
Have a clean rag and a flashlight handy. (Or use your phone’s flashlight app.)
Where to Do It
The best place to inspect your bike is outside, and the two best times to do it are early morning and late afternoon, when the sun is out but isn’t shining in your eyes and the light is subtle.
The second-best place to inspect your bike’s frame for cracks is in the garage of your house or the hallway of your apartment building, as long as it’s well lit. (On a stormy day, performing the inspection inside is your only option.)
How to Do the Inspection
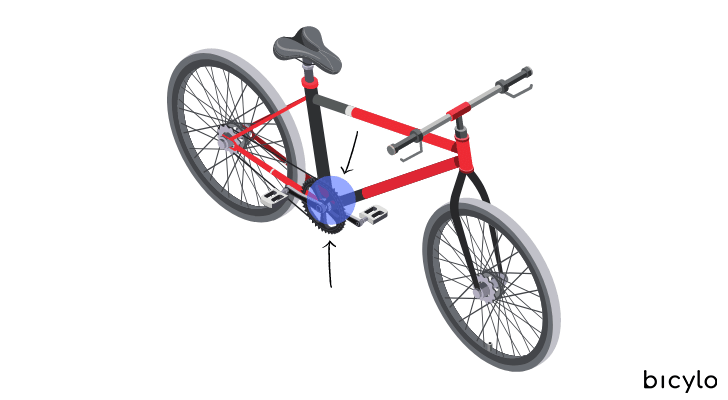
Starting from the bottom bracket shell where the down tube, seat tube, and chainstay meet, shine your flashlight on the frame and look carefully for cracks and signs of damage.
Flip the bike over and inspect the underside of the bottom bracket. (Bikes with hydraulic braking systems shouldn’t be flipped over. In case your bike has hydraulic brakes, enlist someone else’s help to lift and hold it so you can get under it.)
You’re looking for visible cracks in the metal as well as suspicious cracks in the paint job. Paint, especially when it hasn’t been applied properly, can peel off—but stress cracks look different, like a prolonged tear in the paint job.
Use the clean rag to try to wipe, gently, anything that seems like paint cracks. Sometimes, this is just dirt, or even rubber from your shoes’ soles.
Continue by inspecting the tube joints between the top tube and the seat tube, and the seat stay and the seat tube.
If nothing seems off, continue to the dropout.
Move to the front and check the area right above the fork where the top tube, head tube, and down tube meet.
What If You Find a Crack?
For starters, consider the bike not rideworthy and don’t use it until you’re able to rule out that the frame needs to either be repaired or replaced.
To do this, take your bike to a local bike shop or a frame builder, preferably by walking with it rather than riding it. A cracked bicycle frame can sometimes be repaired, but doing so isn’t always worth it.
A professional can help you assess the extent of the damage to the frame, the options for repair, as well as weigh the pros and cons of swapping out the frame for a new one (provided the rest of the bicycle’s worth keeping).
